Abstract
This document provides information to assist in the installation of the Saisei NPE Software Package which is released as an OVA template file set.
Terminology and Acronyms
- AR – Available Rate
- BITW – Bump in the Wire
- CAC – Call Admission Control
- DPDK – Data Plane Development Kit
- DPI – Deep Packet Inspection
- EFC – Egress Flow Class
- EMAP – Egress Policy Map
- FACL – Flow Access Control List
- FR – Fixed Rate
- HE – Host Equalization
- HMAP – Host Policy Map
- IFD – Intelligent Flow Delivery
- IFC – Ingress Flow Class
- IMAP- Ingress Policy Map
- NPE – Network Performance Enforcement
- P2P – Peer to Peer
- QoS – Quality of Service
- STM – Saisei Traffic Manager
- TR – Total Rate
- VoIP – Voice over IP
- VM – Virtual Machine a software based virtual Guest or virtual appliance
- Hypervisor – a hardware abstraction layer enabling multiple VM guests share the resources of a hardware platform, generally an X86 COTS server.
Introduction
The Saisei Traffic Manager platform™ is a highly distributable advanced real time network controller and real time monitoring application. This provides application visibility, policy control and advanced traffic engineering for customers looking to control their business applications through advanced network intelligence to provide deterministic levels of QoS. The patented flow engine provides real time policy based feedback loop to application traffic to ensure business policies are enforced. The NPE is a high capacity traffic manager designed to manage traffic flows to ensure desired performance and quality for all key business applications.
The software package is released in several formats for bare metal and hypervisor installations. This document will concentrate explicitly on the requirements and steps for installing the NPE software package onto either a VMware ESXi 5.1 or 5.5 system
Hardware Requirements
Obviously the basic hardware for any deployment is critical whether it be a bare metal or an ESXi deployment – in both cases the rules for core counts, memory, processor type and hard drive sizes still apply, for the latest rules the reader is referred to the NPE Hardware and System Verification document. This document will list the expectations of any hardware platform on which the NPE software package can run, at the time of writing Saisei will only support software running on certified systems as defined in the previously mentioned Verification Document.
Note: - The supported systems list contains Bare Metal systems only, to run in an ESXi environment the user is required to provide a system that contains the required core count for the desired service model and associated memory and MUST run the hardware verification commands to ensure the chosen XEON can support the required CPU command set.
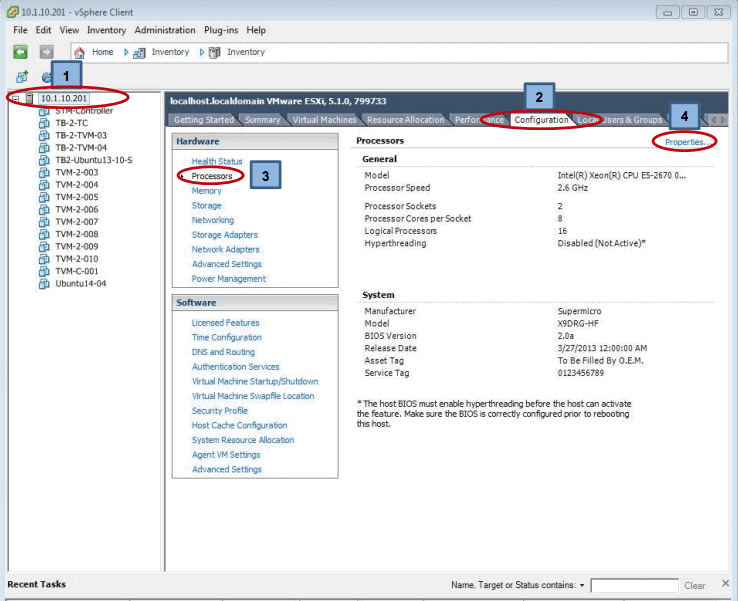
Once logged on verify that memory, cores and drive space is available, here we can select the ESXi host address, Configuration tab and one of the following Processors, Memory and Storage entries to determine the free data store space:
We can also select the Memory and Processor entries to check the capabilities of the system and finally also verify and ensure that Hyper Threading is turned off. Hyper Threading can only be changed if ALL VM’s currently loaded to the ESXi host are powered down – to check however select the ESXi host address followed by the Summary tab which will display core counts and Hyper Threading state.
If Hyper Threading is enabled it will be necessary to power down all VM’s on the ESXi host and then select the Configuration tab followed by Processors entry and finally the Properties option as seen below:
Which results in the following display:
Uncheck the “Enabled” box and hit OK – notice for this to take effect a full reboot of the ESXi host is required.
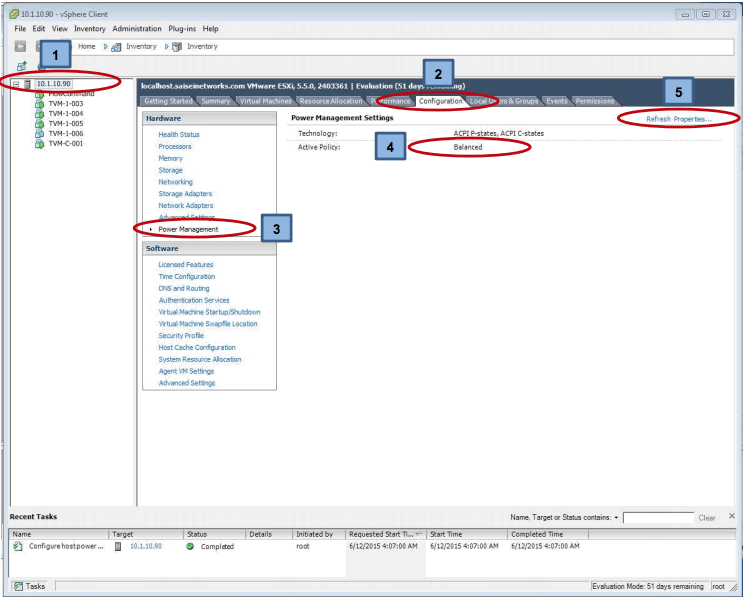
A check for the “Power Management” model should also be performed since the default ESXi installation uses the “Balanced setting” and this should be set to “High Performance”, to view these settings:
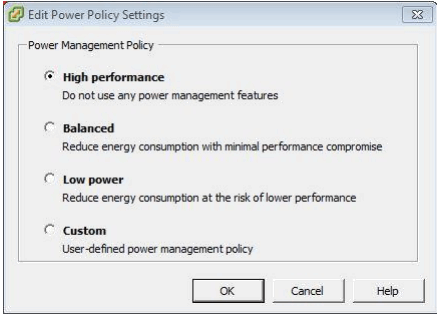
The Properties window opens and make the High Performance selection:
And the Advanced section becomes:
ESXi Prerequisites
The NPE software is released for use with ESXi as an OVA file. This includes all components to ensure successful operation after installation. The software package therefore contains the base Ubuntu 14.04 Operating System together with all packages and updates required for successful operation.
The VM is built with memory, hard drive and core counts required for a “Medium” model and is also configured with a running “Monitor” configuration where we have 2 policy entries for ALL-IP and L2-NON-IP traffic but with the global “Police Flows” parameter set to zero meaning that the system will not attempt to apply and control flow rates.
Should a different model be desired for operation after the installation has completed then it will be necessary to run the system as delivered and change the model in the “Parameters” list from Medium to the desired setting, this is achieved by logging into the GUI and changing the mode from “Normal” to “Expert” – this setting is found in the Upper Right corner of the GUI display. After doing this the Navigation Pane will refresh and by expanding the tree a “Parameters” entry will become visible, now select that entry and right mouse click to see the selection menu and “Modify” – scroll down until you find the model entry and change to Small or Large and select the Modify button. After the window closes select the “running” entry in the tree, right mouse click and select the “Save As” and “Both” options which saves the configuration, once this has been deone reload the system which will now reboot with the desired model.
To access the GUI use http or https to the systems IP address port 5000, eg. 10.1.10.90:5000 the user is admin and the password is admin.
If the system has insufficient memory to allow it to load and run – in which case you will not be able to log into the GUI then it will be necessary to remove the saved configuration file and reboot. To remove the saved configuration file log into the Ubuntu operating system as the configured user using SSH then change to super user using “sudo su” then “cd /etc/stm/conf_files”. In this directory you will see a file name “default_config.cfg”, delete the file and then reboot the system using “shutdown –r now” upon reboot the STM will boot into the “Small” model with only a minimum number of default parameters configured.
The naming convention used for the VM and OVA is of the format: - FlowCommand-Rx-y(-z) which resolves to a Release such that FlowCommand-R5-1.ova is an OVA that contains the Release 5.1 software.
The image also calls for 3 Ethernet Interfaces all of which are configured to use the E1000 driver and are linked to vSwitches, these interfaces are internally known as eth0, eth1 and eth2 from ESXi’s viewpoint. Eth0 is defined as the Management Interface which is configured in the /etc/network/interfaces file to use DHCP to obtain the systems IP address, eth1 and eth2 are configured to connect to separate vSwitches which MUST be separated from the Management vSwitch. By default the first vSwitch created in an ESXi system is the VM Network vSwitch (Normally vSwitch0) which becomes the management path for the ESXi host and also any VM’s that need management access. Eth1 and Eth2 are expected to connect to vSwitches npe-eth1 and npe-eth2.
These vSwitches are of critical importance and MUST be created prior to installing the NPE OVA package, these vSwitches have been called out by name and are linked to the eth1 and eth2 interfaces within the package and if they do not exist the ESXi host will default the interfaces to use the same vSwitch as the Management interface which will result in a non-operational NPE package.
The vSwitch names are npe-eth1 and npe-eth2 to be paired with eth1 and eth2 respectfully, when creating these vSwitches it is also necessary to configure them to be in Promiscuous mode which by default is disabled and finally if VLAN’s are required this must also be enabled for successful operation of the NPE VM.
It is also worth noting at this point that the VM expects 64GB of Memory, 4 cores (preferably on the same socket) and 500GB of drive space making it necessary to verify that there is sufficient space available in a data store prior to installing the software, failure to have the required drive space available will result in a failed installation.
Creating VSwitches
After logging onto the ESXi host select the ESXi host address in the navigation list in this document we use 10.1.10.219 as the ESXi host, then select the “Configuration” tab and finally in the Hardware list select the Networking option. This will result in a screen similar to the following which list all existing vSwitches. Key in the Networking pane are the options at the top of the display and to create a new vSwitch choose the “Add Networking” option.
Key in the Networking pane are the options at the top of the display and to create a new vSwitch choose the “Add Networking” option which results in the following window being displayed:
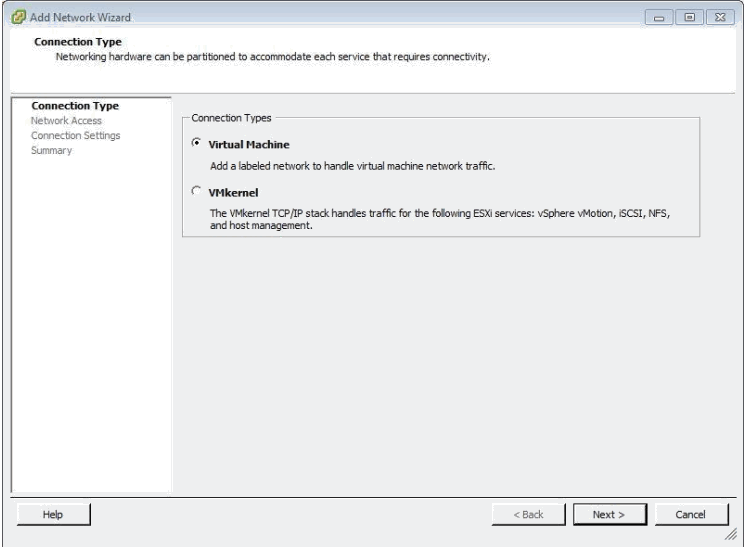
Verify that “Virtual Machine” is selected and then hit “Next” which results in the following window being displayed:
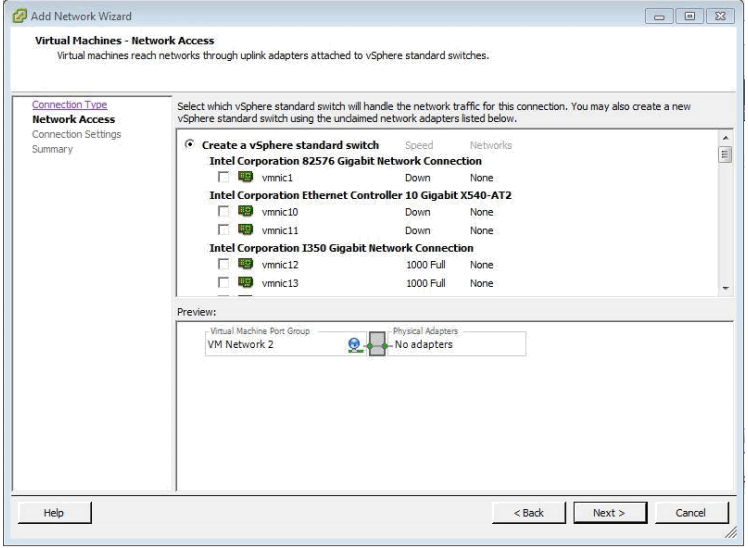
If the actual NIC to be used for each Ethernet interface is NOT known this step can be skipped for now however be aware that this window will open with the first vmnic in the list pre-selected and will need to be deselected. Ideally the actual vmnic’s to use for eth1 and eth2 should be known and should be configured here. Note that eth1 (npe-eth1) is expected to connect to the Internet side of the network while eth2 (npe-eth2) is expected to be connected to the local or internal users. In devices with a large number of real NIC ports some amount of investigation is usually required to determine which physical interface links to which internal vmnic and at worst this may mean cabling each unused port separately and using the vSphere windows to find the cabled interface that displays a speed and link state in the Speed field as shown above. Thus assuming the interfaces for eth1 and eth2 are known select the appropriate interface for each as each vSwitch is configured.
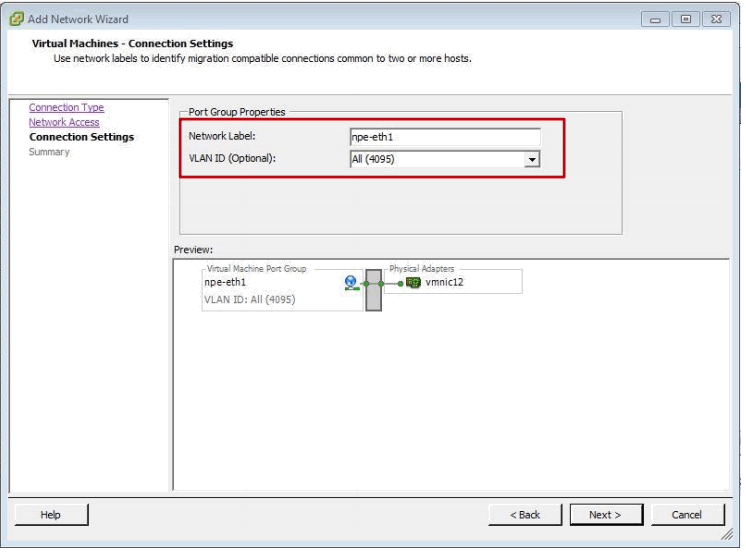
The next step is to give the vSwitch a Network Label – npe-eth1 or npe-eth2 – and additionally enable all VLAN id’s from the pull-down menu list if VLAN operation is required:
Now we can move to the next step and review the summary:
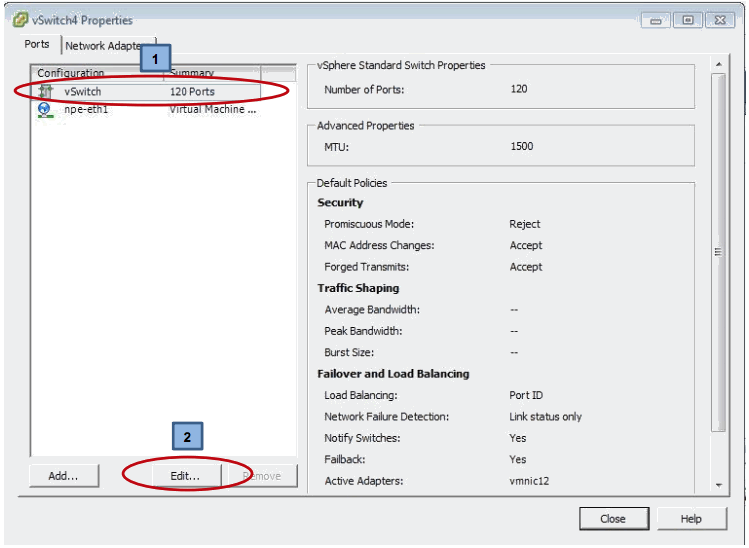
Before closing the summary page now would be the best time to highlight the vSwitch entry in the configuration list followed by the Edit button – this will then allow the vSwitch to be reconfigured into “Promiscuous” mode which is essential for successful operation of the NPE software package.
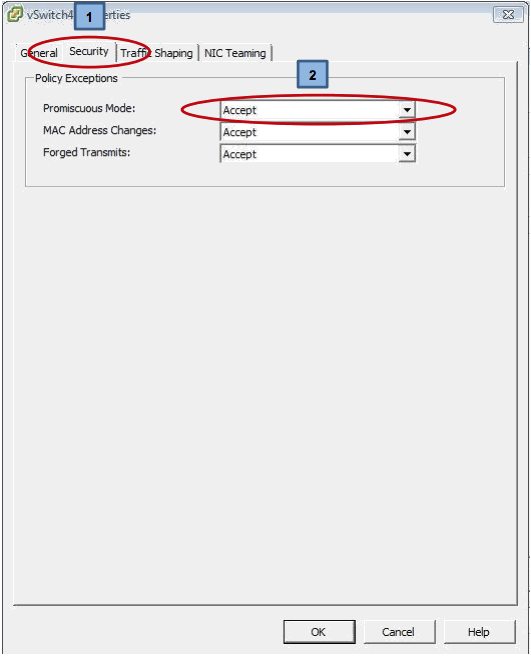
Editing the vSwitch opens the window above with the “General” tab selected – you must now select the “Security” tab which will list the Policy Exceptions and will display the “Promiscuous Mode” entry as “Reject”, change this to “Accept as shown above.
Finally hit the “OK” button and the edit is complete.
At this point you will have successfully created the first vSwitch called npe-eth1, repeat the whole process one more time to create the second vSwitch called npe-eth2.
Once complete all of the required pre-existing configuration elements are now in place and you should now be able to proceed to the deployment of the Release OVA file.
ESXi OVA Installation Procedure
For users and customer who are deploying the NPE software application as a Virtual Machine for the very first VM installation Saisei makes available for every release an ESXi OVA file. The naming convention used having been explained earlier but will be of the format FlowCommand-Rx-y(-z).ova so for Release 5.1.1 for example this becomes FlowCommand-R5-1-1.ova
This OVA has been built for use as a small model which can be changed post deployment should that be necessary. As a Small model the basic requirements for the VM are for 16GB of memory, 8 cores (Preferably on the same socket) and 500GB of hard disk space. It is the user’s responsibility to ensure that these requirements can be met prior to installation of the OVA, failure to have sufficient drive space available will cause a failure of the deployment of the OVA.
Note also that this OVA is built and tested to run on ESXi 5.1 or ESXi 5.5 systems only, other versions of ESXi have not been verified and are therefore deemed to be illegal installations.
To begin log onto the ESXi host that will be supporting this VM.
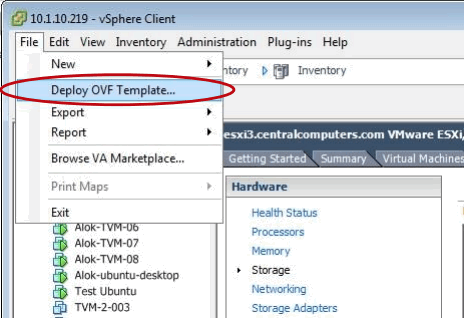
Having logged on we can now begin – first from the File tab select the “Deploy OVF Template” option: -
The following window now opens where we first define the source for the OVA file which is usually on the local machine which was used to connect to vSphere – Note: - it is best to be connected using a 1G network cable rather than WiFi at this point as the file is quite large and wired connections will reduce deployment time. The following example uses an OVA filename of FlowCommand.ova – this should be replaced with the correct version being deployed – thus if you start at Release 5.1 the OVA filename would be FlowCommand-R5-1.ova as explained previously.
Note: - The selected file name in the following window needs to reflect the actual Release being installed.

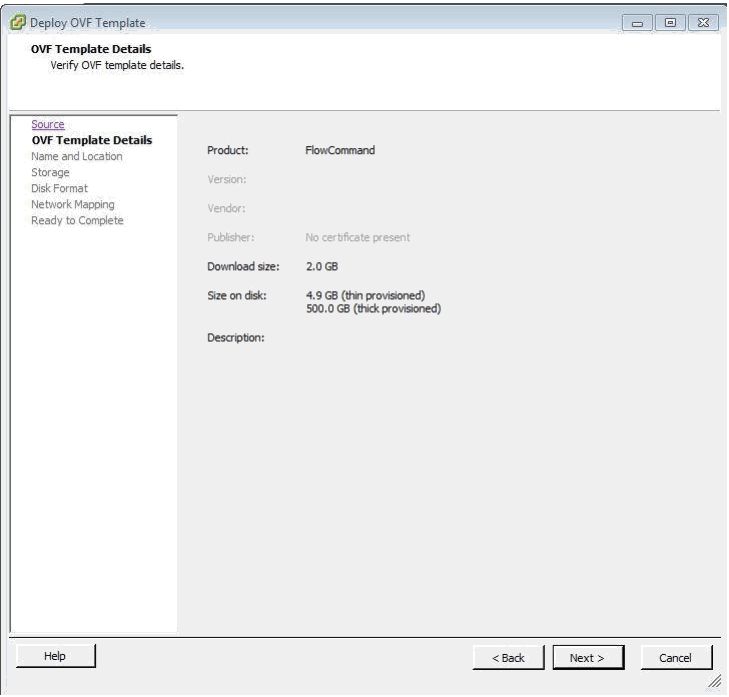
Next we get confirmation of the package size and disk requirements:
You can change the name of the VM – it was created initially with a name of the format: - “FlowCommand-Rx-y(-z)”:
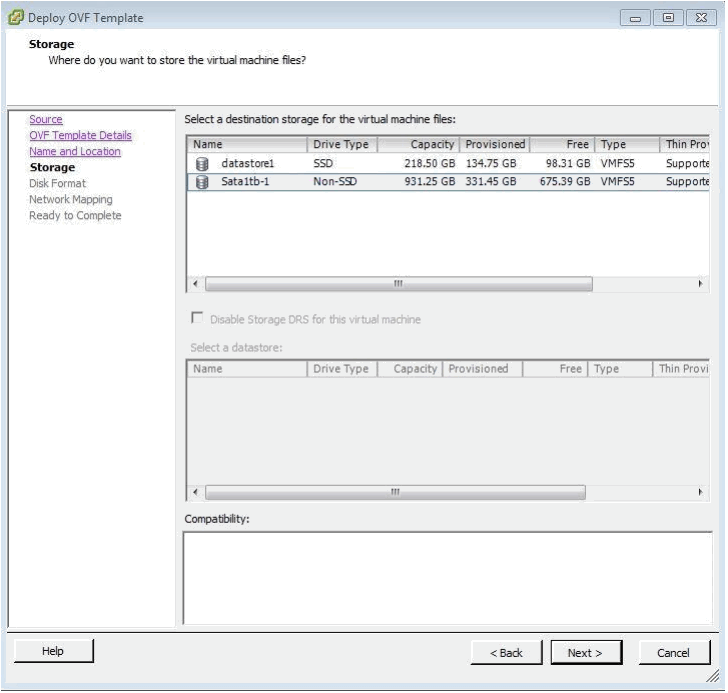
Next you choose the storage location, here you MUST use a data store that has at least 540GB available which is required for the software itself and the 500GB required by the historical data collector:
This is followed by the Disk Format page – please use the preselected options:

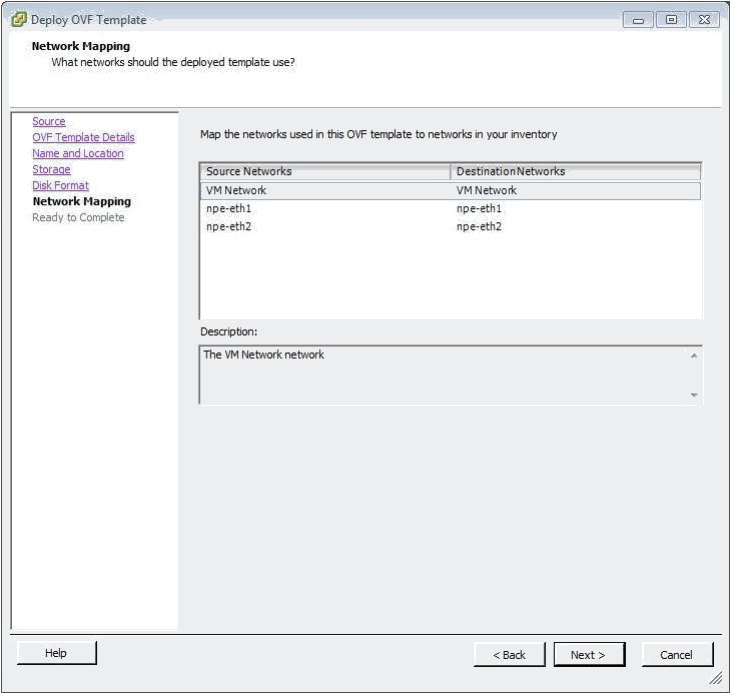
After which the Network Mapping page is displayed – no changes are allowed here but now you can see the need to pre build the vSwitches for operational use:
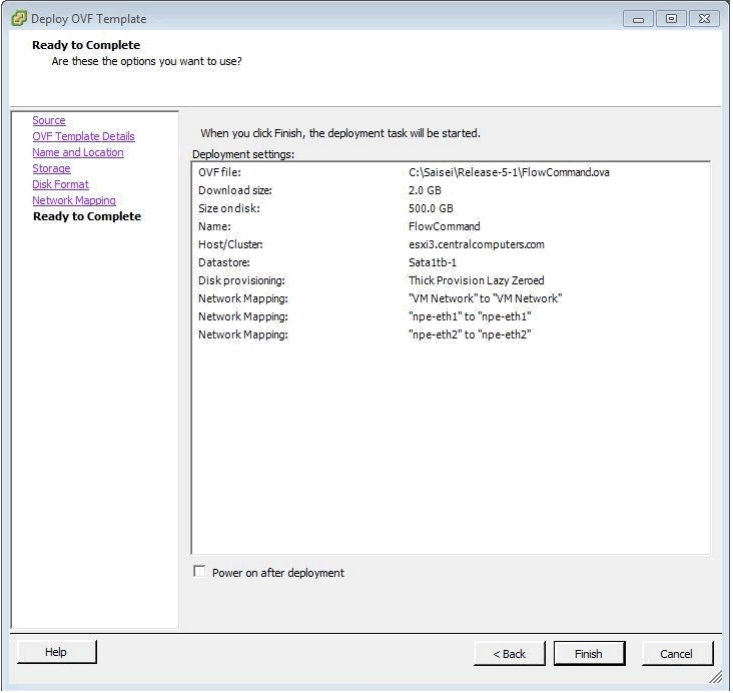
And now the final confirmation page prior to the actual installation:
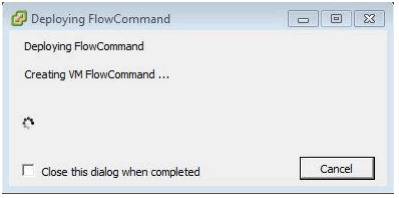
A status dialogue box will now be displayed indicating the extent of the installation process along with an estimate of time remaining:
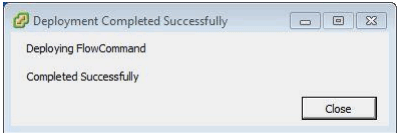
And once the installation is complete a successful operation message should be displayed:
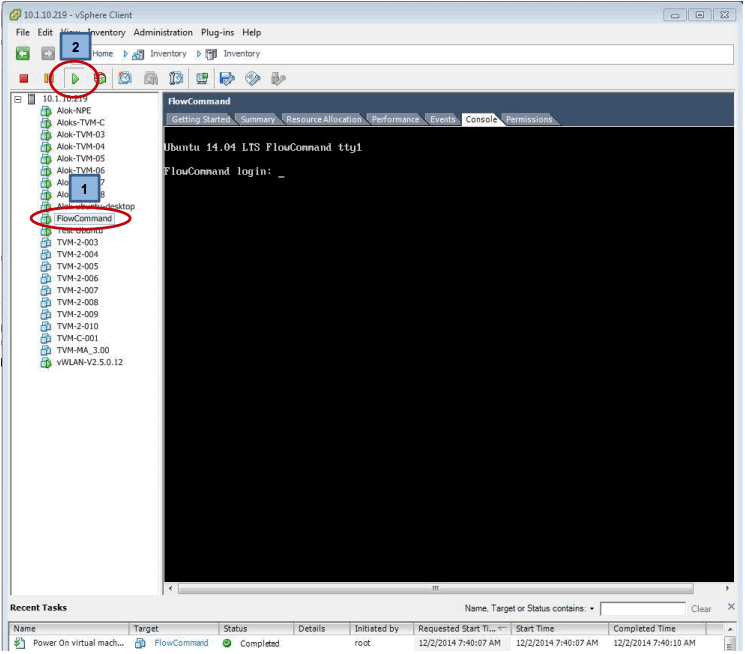
All that remains is to power on the VM by selecting the Green On button followed by selecting the Console tab to monitor the progress of the boot up sequence: -
Note: - The name that appears in the Navigation list will relect the version being install – in this example the name was “FlowCommand” but future releases will use the format “FlowComman-X-X-X” where “X-X-X” indicates the released version such as “5-1-1”. Additionally once the VM is powered up the STM will be running with a full Monitor mode Smal model configuration.
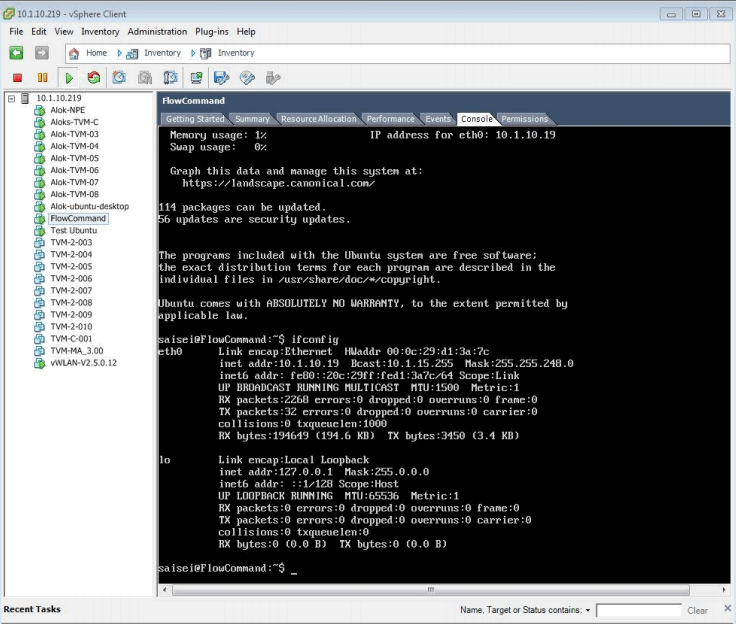
Following a successful deployment it will be necessary to log onto the console to determine systems IP address – by default this is configured to use DHCP – if however the user requires a static IP address then it will be necessary to change the VM’s /etc/network/interfaces for and configure eth0 to use a static IP address and gateway etc. So with the VM highlighted and the Console tab selected a login prompt should now appear – it should be noted here that ESXi does not always trigger the console display, if this happens the user can right mouse click on the VM name in the VM tree and select the “Open Console” option which after several seconds not only opens a new console window but also triggers the main console to activate – this is an ESXi feature. The preconfigured username is “saisei” and the password is also “saisei”.
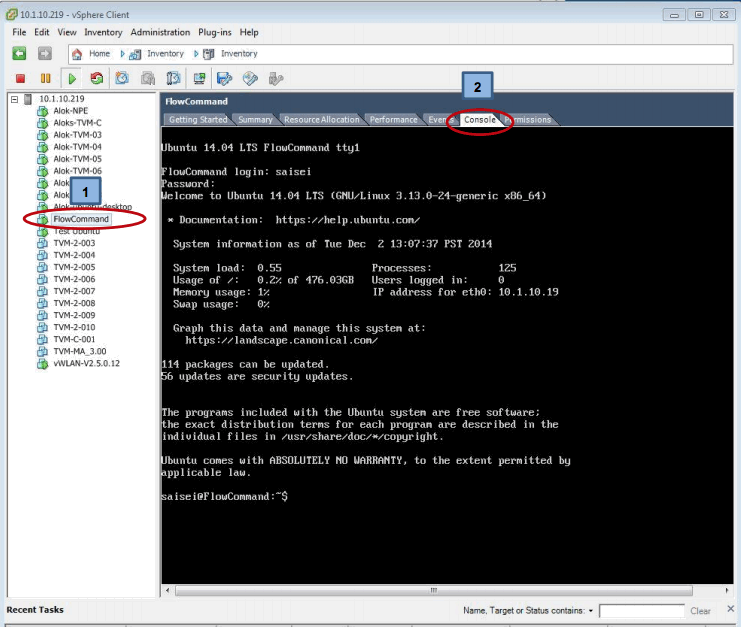
Now you can execute an ifconfig command to determine the IP address of the system since you will need this to access the GUI or CLI – please see the appropriate documentation for details.
Changing Models
While the OVA was built and configured to run the “Medium” system model if it is required to run a different model then it will be necessary to shut down the VM and make changes to the VM’s properties. Prior to shutting down a running system it would be wise to save any configuration changes that have been made during the period of operation.
To power down it is best to right mouse click on the VM name and select the “Power Off” option:
Now we can select the FlowCommand VM and select the Edit Properties button:
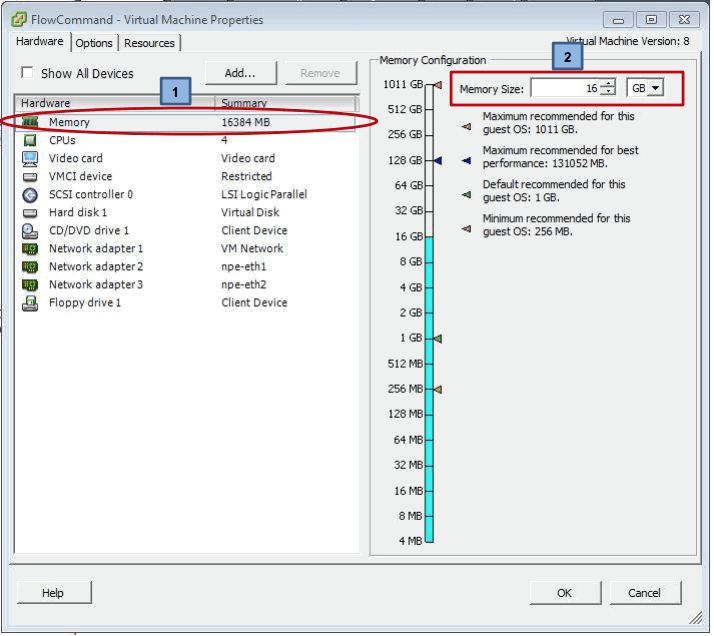
Now we can select the memory and change to 16GB for a Small model, 64GB for a medium model or 256GB for a large model – obviously making sure the memory is available.
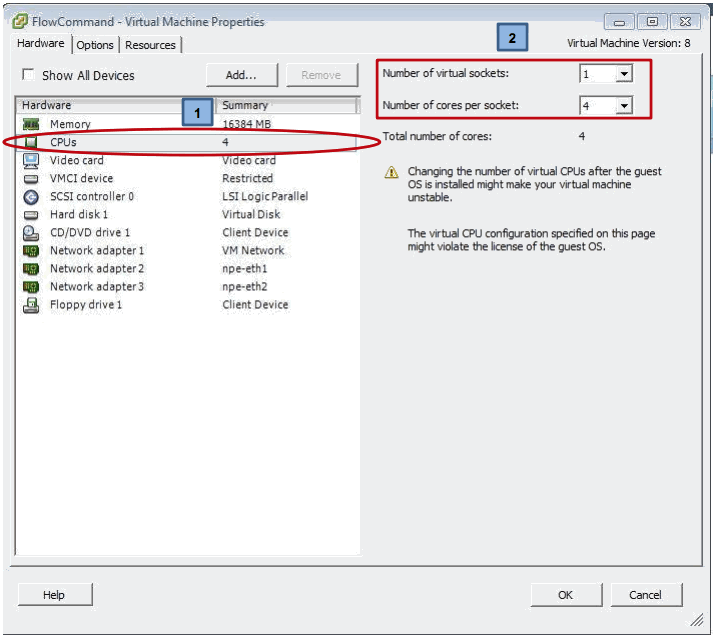
We can also change the core count to 4 for Small, 8 for Medium or 12 for Large Model:
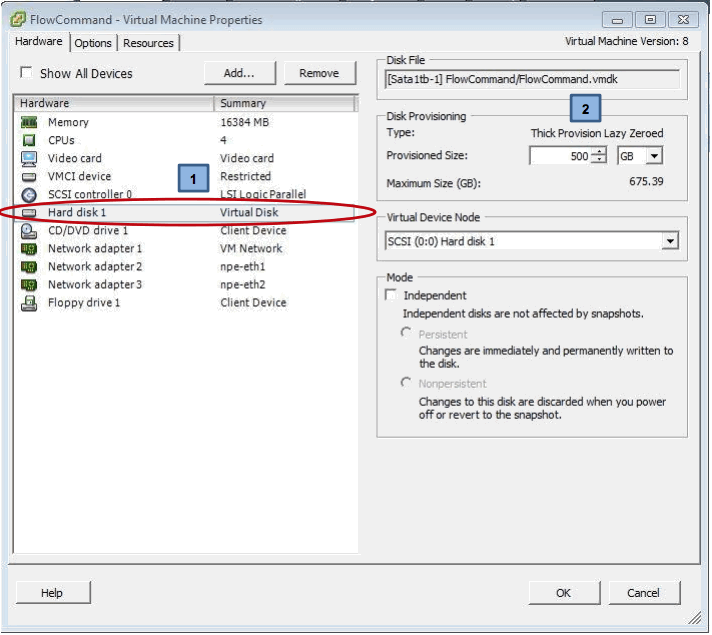
And finally disk space permitting the drive can be increased from the base 500GB:
Once the VM’s physical configuration has been changed we can power up the VM and make the necessary changes to the NPE configuration which means changing the model to either Medium or Large – KEEP IN MIND here that whenever the Model is changed the configuration needs to be saved and the system restarted. The reason for this is that a handful of tables are created at boot time and cannot be changed making it necessary to restart a system whenever the model is reconfigured.
Upgrading an Existing NPE VM
If you already have a known good NPE VM system running Release 5.0 or later then you are allowed to upgrade this to a new version of software.
The upgrade process will load the new version of software into the “alternate” partition for security, it is then the responsibility of the user to save the current configuration to “Both” partitions before using the appropriate CLI or GUI option to reload the NPE to the “alternate” or newest software release.
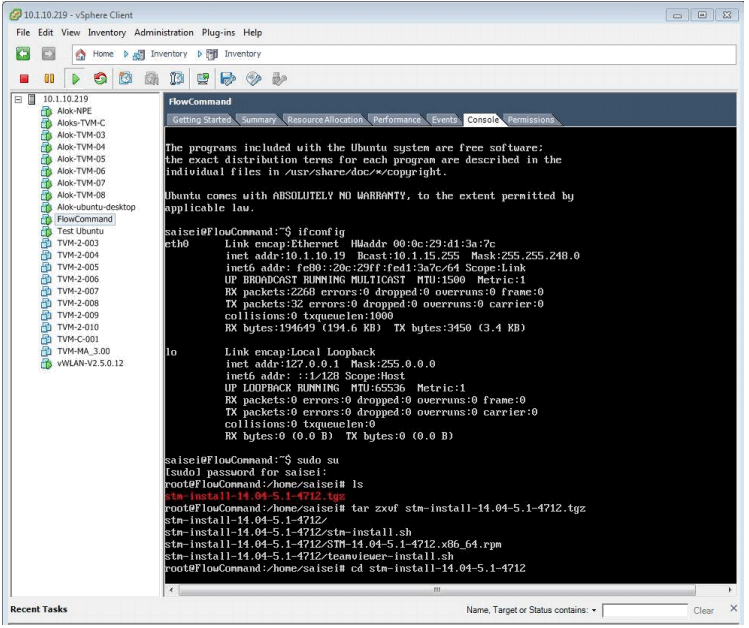
This first step of this process is to download the latest release file from the support site, this file will be the same file you would use on a bare metal system and comes as a tgz tar ball file.
Once this has been downloaded from the support site onto a local drive the user must now “SCP” the file to the VM being upgraded – openssh-server has been loaded to the NPE system to simplify the transaction.
Usually the file will be loaded to the base user’s home directory, that being user saisei with password saisei also for the upgrade it is necessary for the user to be logged in as super user using the “sudo su” command and password saisei.
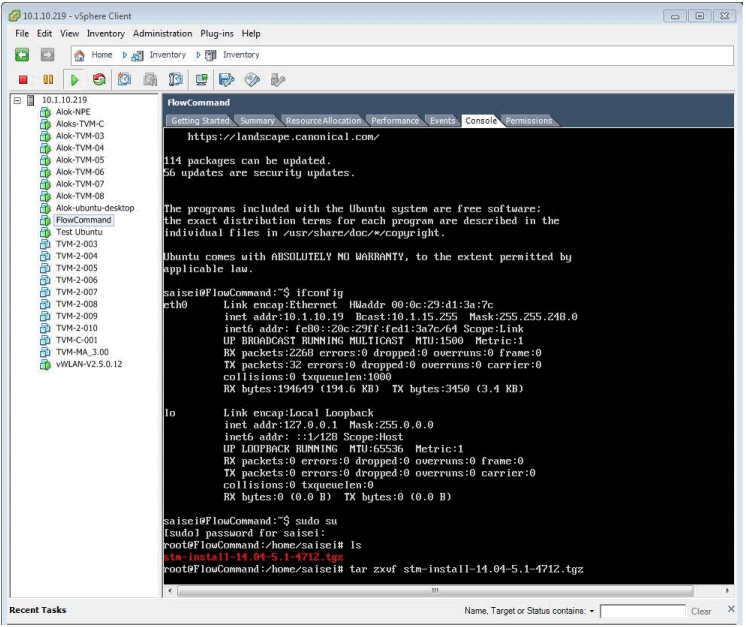
As can be seen above the user is logged on and has entered root level, a typical release file is seen which must then be extracted using the command “tar zxvf filename.tgz”.
The result of the extraction is the creation of a subdirectory whose name is the same as the base tgz file, on closer inspection you will see this contains the OS that it was built for in this example Ubuntu 14.04 which is then followed by the NPE release number – in this case 5.1 and finally the build number which in this example is 4712.
As you can see from the following screen the extraction process has created a new directory loaded with 2 shell files and the release rpm file:
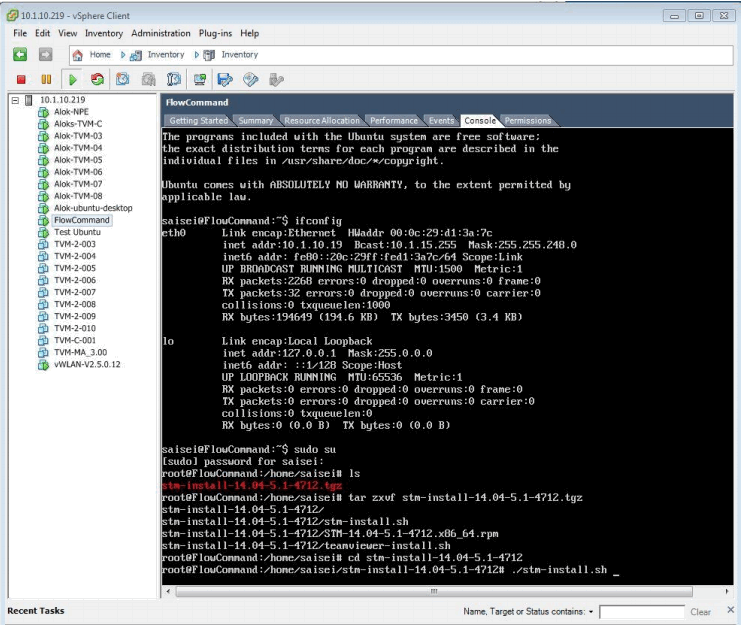
Before executing the shell installation file it is worth reminding the user that for the installation to be successful the system MUST have access to the Internet as there are several hundred files belonging to the base Operating system that must be upgraded to those versions required by the NPE software package. Assuming connectivity exists the installation/upgrade can continue by changing directory to the newly created release directory and executing the stm-install shell file as shown below:
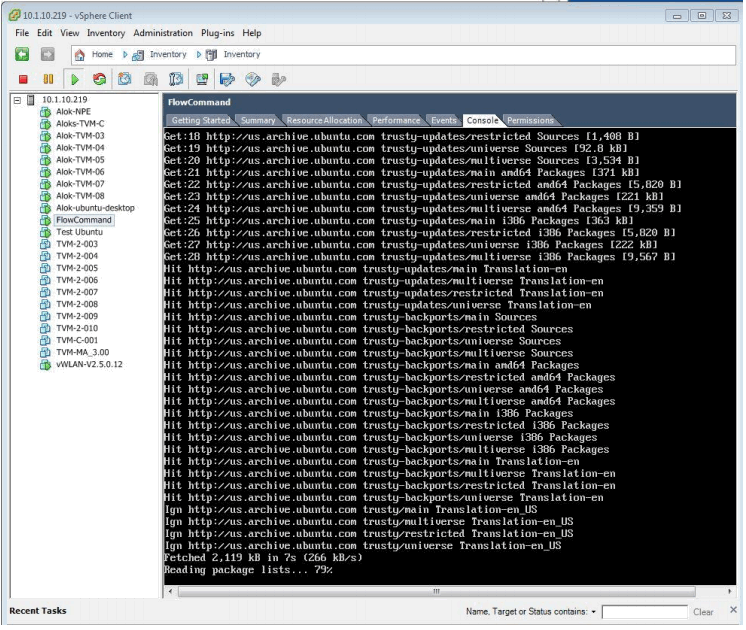
The installation process will take several minutes since there are many updates that must be retrieved from the Internet as shown:
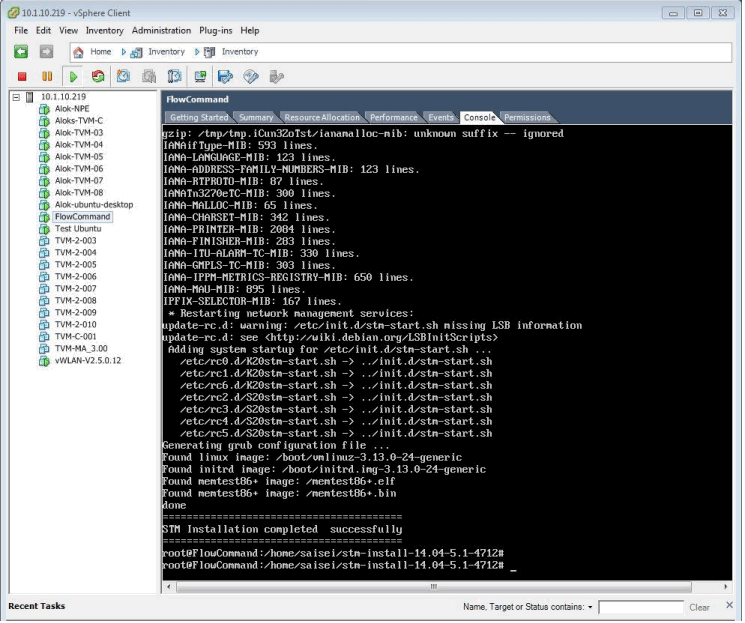
A successful installation will result in the following display:
From Release 6.0 GA we have added automatic creation of management interfaces to deal with the external attacks seen on STM servers in the field. All Linux interfaces that have IP addresses configured when STM is started will be automatically created as STM management interfaces.
The Ubuntu firewall is enabled at every reboot with the previously defined rules being programmed into the firewall. Should a system be on public IP address at a remote data centre it will be necessary to create a list of allowable subnets in a using a comma sseparated value formatted file which must be present at boot time.
Failure to create a list of protected subnets in a file called “firewall_allowed_subnets” may actually lead to the inability to contact the system post upgrade to 6.0 releases and later systems.
It is therefore necessary to create the a file called "firewall_allowed_subnets" in both /etc/stm and /etc/stm.alt That file needs to have a comma separated list of the subnets you want to have access to the system, 0.0.0.0/0 is explicitly NOT allowed.
Add/create the file /etc/stm/firewall_allowed_subnets with the comma separated list of subnets (i.e 50.33.20.0/24) and copy to /etc/stm.alt
If running an older version of the STM and loading Release 6.0 GA for the first time following the installation of the software into the alternate partiion create and copy the firewall_allowed_subnets file into bot /etc/stm and /etc/stm.alt then do the following: -
cd /opt/stm/target.alt
sudo ./firewall_helper.sh
This will actually pre read the file and load the subnets into the firewall prior to it’s activation on rebooting to the new software.
With the firewall now loaded the operator can verify the correct allowed subnets using: - sudo ufw status
This command will list these rules that are in the firewall. If subnets are missing at this point that may need to manage the device the user should edit the firewall_allowed_subnets file prior to switchover and rerun the commands above – failure to add the correct subnets for management purposes will cause connectivity to the STM device to be lost.
At this stage the if this is the first installation of the system to a server the server needs to be reloaded prior to configuring the STM for operation after which the user is free to use the CLI or GUI to to build and save any configuration they require.